Category Archives: Network

PowerShell for EAP-PEAP secured SSTP VPN on Windows 8.1

Simple VPN configurations can be deployed by Group Policy but EAP authentication settings cannot be configured like this, even using Windows 8.1 and Windows Server 2012 R2. Microsoft added some new PowerShell cmdlets to Windows 8.1 for configuring VPNs, but the worked examples do not appear to function for all the settings for PEAP connections, and they do not show a worked example of how you go about exporting and re-importing a connection’s XMLStream.

Defining the XML as a block within the script itself, even assigning it as data type XML does not seem to work. Not being particularly accustomed to PowerShell, the following script took a while to get right. I assigned it as a laptop startup script by GPO. If I need to modify the connection in future I can increment the version number since the script checks the local machine Registry for that, and will not install if the desired version marker is already present.

 
# VPN Connection EAP-PEAP VPN provisioning 
# patters 2013

# This script is loosely based on the EAP-TTLS one published by Microsoft at http://technet.microsoft.com/en-us/library/jj613766.aspx
# The worked examples on that page and at http://technet.microsoft.com/en-us/library/jj554822.aspx
# are rudimentary, and in some details for PEAP, incorrect. To set advanced options like the TrustedRootCAs and the
# the server identity checking warning, you *must* export a GUI-authored config as XML. Configuring XML attributes alone
# will not work because some of them are missing when creating a new connection, and adding them results in errors.


# Check for marker in the Registry, and quit if found
# Desired version is 1
$version = 1
$test = Get-ItemProperty "HKLM:\Software\MyCompany" "MyCompany VPN" -ErrorAction SilentlyContinue
If ($test -eq $null) {
       $test = 0
} else {
       $test = $test."MyCompany VPN"
}
If ($test -ge $version) {exit} 

# VPN Connection look-up to remove any previous installations
$isTestVpn = $false
$vpnConnections = Get-VpnConnection -AllUserConnection
If($vpnConnections.Name -eq "MyCompany VPN") {Remove-VpnConnection -Name "MyCompany VPN" -AllUserConnection -Confirm:$false -Force}
$vpnConnections = Get-VpnConnection
If($vpnConnections.Name -eq "MyCompany VPN") {Remove-VpnConnection -Name "MyCompany VPN" -Confirm:$false -Force}

Try
{
       #-------------------------------------------------
       #The following section documents the attempts to get this working manually before I got importing/exporting of XML working

       # http://technet.microsoft.com/en-us/library/jj554822.aspx says to use "New-EapConfiguration -Peap" here, but is wrong      
       #$a = New-EapConfiguration

       # Generate configuration XML for PEAP authentication method with EAP-MSCHAPv2 as its inner method
       #$b = New-EapConfiguration -Peap -VerifyServerIdentity -FastReconnect $true -TunnledEapAuthMethod $a.EapConfigXmlStream

       # Edit properties within the generated configuration XML
       #$c = $b.EapConfigXmlStream
       #$c.EapHostConfig.Config.Eap.EapType.ServerValidation.ServerNames = "vpn.mycompany.com"

       # Specify AddTrust Root CA for Comodo - This attribute is missing unless you create the connection using the GUI
       # The following appears to generate the XML correctly, but it won't be accepted by the Add-VpnConnection cmdlet
       #$c.EapHostConfig.Config.Eap.EapType.ServerValidation.SetAttribute("TrustedRootCA","02 fa f3 e2 91 43 54 68 60 78 57 69 4d f5 e4 5b 68 85 18 68")   

       # PeapExtensions settings are nested XML objects so setting them as string datatype will fail
       # see http://www.vistax64.com/powershell/173859-xml-property-text.html
       #$c.EapHostConfig.Config.Eap.EapType.PeapExtensions.PerformServerValidation."#text" = "true"
       #$c.EapHostConfig.Config.Eap.EapType.PeapExtensions.AcceptServerName."#text" = "true"
       # Once again this attribute is missing unless the connection is created using the GUI. Adding it does not work
       #$c.EapHostConfig.Config.Eap.EapType.PeapExtensions.PeapExtensionsV2.AllowPromptingWhenServerCANotFound."#text" = "true"      

       # Create the VPN connection ‘MyCompany VPN’ with the EAP configuration XML generated above
       #Add-VpnConnection -Name "MyCompany VPN" -ServerAddress "vpn.mycompany.com" -TunnelType Sstp -EncryptionLevel Maximum -AuthenticationMethod Eap -EapConfigXmlStream $c -AllUserConnection
       #-------------------------------------------------


       # FORTUNATELY THERE IS AN EASIER WAY (once you figure out PowerShell XML – why couldn’t MS have shown a worked example in the docs)...


       # Create your VPN configuration entry manually then export its XML like so:
       #$exportXML = (Get-VpnConnection -Name "My_VPN_Final" -AllUserConnection).EapConfigXmlStream
       #$exportXML.Save("${env:temp}\My_VPN_config.xml")

       $importXML = New-Object XML
       $importXML.Load("\\mycompany.com\data\Software\MyCompany VPN\MyCompany VPN.xml")
       Add-VpnConnection -Name "MyCompany VPN" -ServerAddress "vpn.mycompany.com" -TunnelType Sstp -EncryptionLevel Maximum -AuthenticationMethod Eap -EapConfigXmlStream $importXML -AllUserConnection
       
       # Leave a marker in the Registry
       If (-Not (Test-Path "HKLM:\Software\MyCompany")) {New-Item -Path "HKLM:\Software\MyCompany"}
       if (Get-ItemProperty "HKLM:\Software\MyCompany" "MyCompany VPN" -ErrorAction SilentlyContinue) {
              Set-ItemProperty -Path "HKLM:\Software\MyCompany" -Name "MyCompany VPN" -Value $version
       } else {
              New-ItemProperty -Path "HKLM:\Software\MyCompany" -Name "MyCompany VPN" -Value $version
       }

}
Catch
{
       Write-Host "Error in connection setup!"
       Write-Host $_.Exception.Message
       Throw
}

Disabling Windows IPv6 tunnelling

Just after doing an Active Directory migration to Windows 2008 R2 native mode I started experiencing odd DNS registration behaviour. The DNS for this domain is hosted in AD, so the migration meant that all DNS servers were now 2008 R2 (replacing 2003 R2). As a result, some 2008 R2 member servers decided to register IPv6 addresses for their automatic 6to4 tunnel interfaces in DNS which led to connectivity problems for clients (which are all Windows 7, and therefore IPv6 aware). What was really strange is that this was not consistent. Some servers were unaffected, despite being in the same subnet.

The workaround was to disable all IPv6 tunnelling over IPv4. Here are the netsh commands since they vary enough to be confusing…


to disable:

netsh interface ipv6 6to4 set state state=disabled
netsh interface ipv6 set teredo type=disabled
netsh interface ipv6 isatap set state state=disabled
 

to query:

netsh interface ipv6 6to4 show state
netsh interface ipv6 show teredo state
netsh interface ipv6 isatap show state
 

Cisco wifi WPA2-Enterprise PEAP authentication with Active Directory

Business users increasingly expect full LAN access while working wirelessly around the workplace. On account of the perceived weakness of WPA cryptography many network administrators will tend to offer a separate guest network over wifi, but not the full corporate LAN. I was one of those people until I got this working six months ago. This solution supports Mac, PC clients, together with iOS devices (iPhone, iPad), and I would guess Linux too since it’s based on open standards.

There is a pretty comprehensive Cisco configuration example document on this subject, but there isn’t much information on the web apart from that. There are several drawbacks to that guide:-

  • it only outlines the GUI config of a centralised Cisco Wireless LAN Controller (not standalone Cisco wifi access points)
  • it deals with Windows Server 2003 IAS rather than its more current replacement: NPS, as introduced by Windows Server 2008.
  • it assumes that the client will be running Cisco wifi client software (presumably it pre-dates the introduction of Windows’ own Wireless Network control panel introduced with XP Service Pack 1).

The access points authenticate using PEAP which is EAP inside a TLS session, therefore a working PKI is required for creating the NPS server’s certificate. If you don’t already have it, install the Active Directory Certificate Services role to one of your Windows domain servers. As I mentioned in my LDAPS guide, that whole process is somewhat outside the scope of this blog post but do heed Microsoft’s warning:

Warning Before you install a certification authority (CA), you should be aware that you are creating or extending a public key infrastructure (PKI). Be sure to design a PKI that is appropriate for your organization. See PKI Design Brief Overview for additional information.


Windows PKI Problems

DCs should auto-enroll for their own certificates once that’s up and running. However I had huge difficulties with this. I installed the Active Directory Certificate Services role on a Windows Server 2008 R2 Domain Controller. I soon discovered that none of the other 2008 R2 DCs could auto-enroll for certificates (the Event Log reported RPC server unavailable in the failure event which was quite misleading). I could not manually enroll for certificates using the Certificates MMC snap-in either.

This held me up for a long time, and I was able to find several sources stating that the solution was to add the Domain Controllers to the group CERTSVC_DCOM_ACCESS, which didn’t work for me. In the end I found the solution in this Technet answer by Joson Zhou. Somebody in the distant past had apparently tampered the Active Directory group membership of Builtin\Users (CN=Users,CN=Builtin,DC=domain,DC=com) and had removed Interactive and Authenticated Users. It had been like this for years with no adverse impact. Since a DC has no local accounts it will use this AD group as its definition of which users have User privileges. I suppose that up until this time no service that would have been affected had been installed on a DC.
I called a business contact to verify against an external Active Directory and, sure enough, those missing groups should indeed have been members. The moment I corrected this I was able to enroll for a DC certificate. Sadly the Technet thread is locked so I wasn’t able to thank Joson, and unfortunately it seems you can’t send private messages. I don’t understand why anyone would be inclined to interfere with default Active Directory groups – searching only reveals this post. The guy asks if it’s best practice to remove Authenticated Users from that group and is pretty roundly slapped down. Perhaps people did this with NT 4.0, which my domain dates from.

I also had a recurring issue in the Event Logs where these DCs would fail to pull down the Certificate Revocation Lists from Microsoft and fail to refresh the Trusted Root certificates. Microsoft KB931125 was the only thing that fixed that. However, while troubleshooting this problem I ended up installing the Trusted Root CA update pack (from here I think), assuming I’d be able to uninstall it later if it didn’t improve things. Unfortunately it cannot be uninstalled, and it caused me another huge hold-up later on.


Configuring Network Policy Server

Once your Domain Controller has a certificate you can install the Network Policy Server role. Each access point (or only your WLC if you use LWAPP access points) will need to be on a static IP address, and have an entry in the RADIUS clients section of the NPS management MMC. When generating Pre-Shared Keys note that it seems Cisco devices do not tolerate keys containing a dollar sign, at least not in their WebUI.

NPS RADIUS client settings

The behaviour for Windows computers is that before logon the PC will authenticate and connect using its computer account (providing connectivity to the domain), then when the user logs in the wifi network is re-connected in that user context. You will therefore probably need an NPS Network Policy item for both cases (NPS -> Policies -> Network Policies) which will allow you to apply different settings to each (timeouts, etc.):
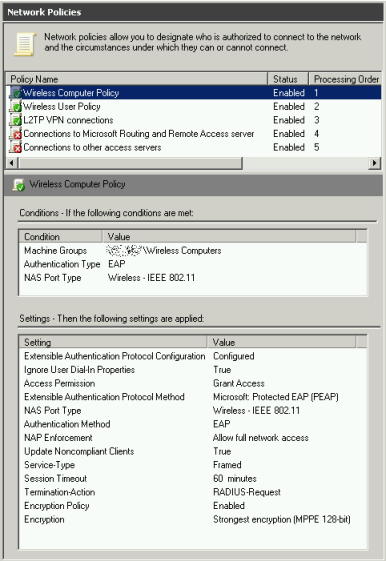
NPS policy for wireless computers
NPS policy for wireless users

In each of the policies be sure to select PEAP as the only EAP authentication type, with EAP-MSCHAP v2 as below, selecting your server’s certificate in the drop-down.
NPS server PEAP encryption settings

Make sure that your Connection Request Policies are not preventing connections (NPS -> Policies -> Connection Request Policies) – I think they are disabled by default.


Access Point Configuration

I won’t bother to describe the Cisco WLC configuration, since that is basically identical to Cisco’s own guide. However, one problem I had in testing was that I removed and re-added the RADIUS server settings on the WLC and I had forgotten that you need to specify your NPS server twice – once for Authentication, and separately once again for Accounting (assuming you’re using accounting), which is not the case in the Server Manager GUI on standalone access points:

Wireless LAN Controller RADIUS server settings

Not everyone has the budget for a WLC, or you might, like me, have combination of a WLC at one site but not at others. It’s not practical to use a single WLC for multiple sites since all LWAPP traffic is trunked back to the controller – you wouldn’t want that load on your site-to-site links. Here is a sample multiple SSID configuration for a standalone Cisco 1131AG Access Point (AIR-AP1131AG-E-K9). I’m not going to provide Cisco access point GUI screenshots, but if you want them the first part of the following guide covers that well:
http://blog.laurence.id.au/2010/03/running-peap-with-cisco-aeronet-1231g.html

My example access point config below relates to the following schematic. If you’re going to apply this config to a bare unit, substitute the IPs and VLANs to match your environment and remove the lines with keys or passwords.
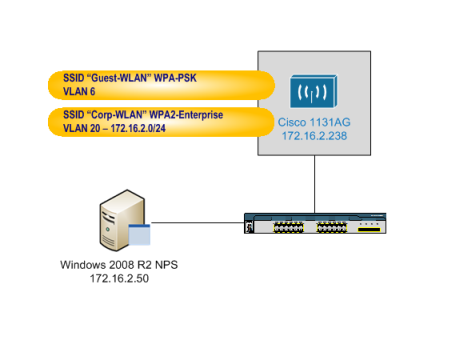
Sample access point config schematic

!
! Last configuration change at 17:13:17 UTC Tue Feb 22 2011 by admin
! NVRAM config last updated at 17:14:03 UTC Tue Feb 22 2011 by admin
!
version 12.4
no service pad
service timestamps debug datetime msec
service timestamps log datetime msec
service password-encryption
!
hostname test-ap1
!
logging rate-limit console 9
enable secret 5 3242576EABCD3F3254$2
!
aaa new-model
!
!
aaa group server radius rad_eap
 server 172.16.2.50 auth-port 1645 acct-port 1646
!
aaa group server radius rad_mac
!
aaa group server radius rad_acct
 server 172.16.2.50 auth-port 1645 acct-port 1646
!
aaa group server radius rad_admin
!
aaa group server tacacs+ tac_admin
!
aaa group server radius rad_pmip
!
aaa group server radius dummy
!
aaa authentication login eap_methods group rad_eap
aaa authentication login mac_methods local
aaa authorization exec default local
aaa accounting network acct_methods start-stop group rad_acct
!
aaa session-id common
ip domain name domain.com
ip name-server 208.67.222.222
ip name-server 208.67.220.220
!
!
dot11 syslog
dot11 vlan-name Wifi-Corp-WLAN vlan 20
dot11 vlan-name Wifi-Guest-WLAN vlan 6
!
dot11 ssid Corp-WLAN
   vlan 20
   authentication open eap eap_methods
   authentication key-management wpa version 2
   accounting acct_methods
   mbssid guest-mode
!
dot11 ssid Guest-WLAN
   vlan 6
   authentication open
   authentication key-management wpa
   guest-mode
   mbssid guest-mode
   wpa-psk ascii 7 123475652142BCD122
!
power inline negotiation prestandard source
!
!
username admin privilege 15 secret 5 131412ABDEFEE42323
!
!
bridge irb
!
!
interface Dot11Radio0
 no ip address
 no ip route-cache
 !
 encryption mode ciphers tkip
 !
 encryption vlan 20 mode ciphers aes-ccm
 !
 encryption vlan 6 mode ciphers aes-ccm tkip
 !
 ssid Corp-WLAN
 !
 ssid Guest-WLAN
 !
 mbssid
 station-role root
!
interface Dot11Radio0.20
 encapsulation dot1Q 20 native
 no ip route-cache
 bridge-group 1
 bridge-group 1 subscriber-loop-control
 bridge-group 1 block-unknown-source
 no bridge-group 1 source-learning
 no bridge-group 1 unicast-flooding
 bridge-group 1 spanning-disabled
!
interface Dot11Radio0.6
 encapsulation dot1Q 6
 no ip route-cache
 bridge-group 6
 bridge-group 6 subscriber-loop-control
 bridge-group 6 block-unknown-source
 no bridge-group 6 source-learning
 no bridge-group 6 unicast-flooding
 bridge-group 6 spanning-disabled
!
interface Dot11Radio1
 no ip address
 no ip route-cache
 !
 encryption mode ciphers tkip
 !
 encryption vlan 20 mode ciphers aes-ccm
 !
 encryption vlan 6 mode ciphers aes-ccm tkip
 !
 ssid Corp-WLAN
 !
 ssid Guest-WLAN
 !
 no dfs band block
 mbssid
 channel dfs
 station-role root
!
interface Dot11Radio1.20
 encapsulation dot1Q 20 native
 no ip route-cache
 bridge-group 1
 bridge-group 1 subscriber-loop-control
 bridge-group 1 block-unknown-source
 no bridge-group 1 source-learning
 no bridge-group 1 unicast-flooding
 bridge-group 1 spanning-disabled
!
interface Dot11Radio1.6
 encapsulation dot1Q 6
 no ip route-cache
 bridge-group 6
 bridge-group 6 subscriber-loop-control
 bridge-group 6 block-unknown-source
 no bridge-group 6 source-learning
 no bridge-group 6 unicast-flooding
 bridge-group 6 spanning-disabled
!
interface FastEthernet0
 no ip address
 no ip route-cache
 duplex auto
 speed auto
!
interface FastEthernet0.20
 encapsulation dot1Q 20 native
 no ip route-cache
 bridge-group 1
 no bridge-group 1 source-learning
 bridge-group 1 spanning-disabled
!
interface FastEthernet0.6
 encapsulation dot1Q 6
 no ip route-cache
 bridge-group 6
 no bridge-group 6 source-learning
 bridge-group 6 spanning-disabled
!
interface BVI1
 ip address 172.16.2.238 255.255.255.0
 no ip route-cache
!
ip default-gateway 172.16.2.254
ip http server
no ip http secure-server
ip http help-path http://www.cisco.com/warp/public/779/smbiz/prodconfig/help/eag
ip radius source-interface BVI1
snmp-server community public RO
radius-server attribute 32 include-in-access-req format %h
radius-server host 172.16.2.50 auth-port 1645 acct-port 1646 key 7 14154A12D56B57231FDC235331292321631B212212034332
radius-server vsa send accounting
bridge 1 route ip
!
!
!
line con 0
line vty 0 4
!
sntp server 130.159.196.118
sntp server 195.66.148.150
sntp server 84.45.87.84
sntp broadcast client
end


The Final PKI Hurdle

Each time I tried to authenticate I got an Schannel Event Log error on the NPS server of “The message received was unexpected or badly formatted.” which exactly matched the symptoms described in Microsoft KB933430, although that was only intended for Windows Server 2003. This was confusing, but according to that article:

When asking for client authentication, this server sends a list of trusted certificate authorities to the client. The client uses this list to choose a client certificate that is trusted by the server. Currently, this server trusts so many certificate authorities that the list has grown too long. This list has thus been truncated. The administrator of this machine should review the certificate authorities trusted for client authentication and remove those that do not really need to be trusted.

I had been working on this issue sporadically and I had only got as far as getting the Enterprise CA online before going on holiday. Only later did I make the connection and remember the updated Trusted Root CA pack that I had loaded on in desperation. Consulting the Certificates MMC snap-in I discovered that the server had 304 trusted root CAs instead of nine! Windows Server 2008 and 2008 R2 do have a more generous storage allowance for sending CA certificates in the PEAP handshake but clearly 304 certificates was too much. Using another server as a reference machine I manually deleted all the superfluous CA certificates and I could finally authenticate via wifi!


Non-Domain Client Configuration

When connecting from non-domain machines or iOS devices, the issuing CA for the NPS server’s certificate will not be trusted. In iOS you will be prompted to accept it manually, but the situation is more complicated in Windows 7 (I haven’t tested older OS versions). In my tests the connection would be rejected upon providing the additional user credentials. You will need to export the CA server certificate by running the following command on your CA:

certutil -ca.cert c:\temp\domain-SERVERNAME-CA.cer
 

On the Windows 7 client use the Certificates MMC snap-in to import it into the user’s Trusted Root CA Certificate Store (run MMC.EXE, File -> Add/Remove Snap-in -> Certificates -> My User Account -> Trusted Root Certification Authorities -> Certificates -> right-click -> All Tasks -> Import).

Now if you try to connect you will get the following message:

The Credentials provided by the server could not be validated. We recommend that you terminate the connection and contact your administrator with the information provided in the details. You may still connect but doing so exposes you to a security risk by a possible rogue server.


I found that I couldn’t connect even if I ignored this warning. To get around this, you will need to create the wireless network manually using the following settings:

Manual connection settings for Windows 7 (part 1)

Make sure to manually select your CA which should be listed as below:

Manual connection settings for Windows 7 (part 2)


Windows AD Domain Client Configuration by Group Policy

Domain workstations can have their wireless networking configs entirely managed by Group Policy, including network preference order, auto connect options, whether to cache credentials and more. Domain members also implicitly trust the Domain CA. Be aware that Windows XP workstations are configured by a separate policy to Windows Vista and Windows 7. Both Group Policies are located at Computer Configuration -> Policies -> Windows Settings -> Security Settings -> Wireless Network (IEEE 802.11) Policies. It’s all pretty self-explanatory, and the security and encryption settings are broadly identical to those in the screenshots above, except that you do not need to specify the CA.

Remember to add your designated wifi users and computers to the AD groups you created for the NPS Network Policies!

iPad, iPhone, and Mac OS X L2TP/IPsec VPN to Windows Server 2008 R2

I spent quite a while experimenting with L2TP over IPsec with my iPad 2, and surprisingly found no useful guides as to how to configure it. Judging by what I could find online, most people simply give up and use PPTP instead which has significant security vulnerabilities. Here’s a concise comparison of PPTP versus L2TP/IPsec which describes that weakness:
http://www.ivpn.net/pptp-vs-l2tp-vs-openvpn.php

I had considered using Apple’s support for Cisco IPsec but that would have meant exposing the core switch where I work. It’s old enough to make that a bad idea. The Juniper Netscreen firewall only supports L2TP with certificates and not Pre-Shared Key so that was also ruled out. This post will outline how to configure Windows Server 2008 R2’s NPS/RRAS role to host L2TP/IPsec connections which will allow iPads and iPhones to connect securely into your Windows infrastructure without the need for additional client software.

Firstly, it’s likely that your NPS/RRAS server is behind a perimeter firewall. If this is the case you’ll need to grant IPsec traffic access from the public internet. Using details from this Technet post I created the following custom service object on the Netscreen firewall, and allowed it inbound to the RRAS server (IP protocols 50 and 51, UDP 500 and 4500). For initial testing though you should probably create a rule to allow all traffic to and from your test client.

IPSec service definition

I am going to assume a knowledge of both NPS and RRAS. For more information on those, other guides exist. As far as I have been able to discover, it seems that the iPad only supports Pre-Shared Key authentication for the IPsec tunnel, rather than certificates-based. The VPN connection settings GUI in Mac OS 10.6 for instance will allow either method, but not in iOS. It may be possible to force your way around this with the iPhone Configuration Utility (designed for applying corporate settings to iOS) but information is pretty scant. I did find a long forum thread about certificate auto-enrollment, and a Microsoft Directory Services team blog post, but I suspect they may relate more to 802.1x:
https://discussions.apple.com/message/10402090
http://blogs.technet.com/b/askds/archive/2010/11/22/ipad-iphone-certificate-issuance.aspx

The L2TP/IPsec Pre-Shared Key is configured by right-clicking on the top level of Routing and Remote Access in Server Manager -> Properties -> Security tab:
Pre-Shared Key for IPsec tunnel

It’s useful to keep your VPN clients on a different subnet to your servers, however multihoming with several NICs can cause problems, particularly if your RRAS server is also a Domain Controller. You can define a subnet for this purpose in the IPv4 tab here, but you will need to remember to add a static route entry on your router pointing traffic for this subnet to the RRAS server.

RRAS client subnet settings

In Server Manager -> NPS -> Policies -> Network Policies create a policy with the following settings, making sure to set the encryption settings. As this Microsoft KB article makes clear, these options actually ensure that IPsec gets used, with the different grades here representing different algorithm proposal combinations. The iPad supports the maximum encryption setting.

NPS Policy Settings for L2TP/IPSec

Lastly, the Mac OS X and iOS VPN client configuration is pretty self-explanatory. Make sure to use the Pre-Shared Key that you defined on the RRAS server (referred to here as Secret):

iPad L2TP VPN configuration

I would at this point like to thoroughly recommend iTap RDP as being the best iOS Remote Desktop client I have seen. It has NLA authentication support, a universal iPad/iPhone binary, and by far the most intuitive controls which really puts it ahead of the competition.

UPDATE – I was hoping to use this VPN configuration for all clients, but it seems that Mac OS clients cannot connect. Mac OS apparently didn’t use the standard L2TP UDP port 1701. Someone compiled a fix for Snow Leopard but I could not get it to work. It’s possible that this is all out of date information though.

UPDATE 2 – I did some more troubleshooting from home and discovered that when a tunnel is initiated from a second device on my home network while another tunnel is already up, all further connection attempts then fail for a long while, even when the RRAS server is rebooted. This would suggest that the Netscreen firewall at my work still considers the original session open, and thus it will eventually timeout after 30 minutes. This behaviour had disrupted my Mac OS X test results. Using verbose logging on the Mac and looking at the NPS log I could see that Mac OS X 10.6.8 VPN client does not accept the 128bit encryption setting. Permitting 56bit encryption allows Macs to connect, but perhaps older versions of Mac OS could have difficulties. I have updated the policy settings screenshot above.

UPDATE 3 – I realised that although NATed clients could connect, clients with public addresses could not. I have amended the destination ports for IP protocols 50 and 51 in the firewall IPsec definition screenshot (it had defaulted to 0-0 rather than 0-65535 for some reason). I have verified that this VPN works for Windows XP clients, Windows 7, Mac OS X 10.6, and Mac OS X 10.5, as well as iPhones (mine’s on iOS 3.1.3) and iPads. Once connected to the RRAS server you cannot interact with that server directly, so make sure that the RRAS server’s own DNS settings do not refer to itself as a primary (assuming it’s also a DNS server) – these DNS entries will be inherited by all VPN clients.

Synology DiskStation SSH Tunnelling

Included in the SSH specification is the hugely overlooked ability to tunnel traffic. Looking on the Synology forums and the Web in general I saw plenty of articles and blog posts on how to enable port forwarding on your router for all the various services these appliances can provide. Many of these services transmit their data in non-encrypted form, with passwords being sent in clear text. However, there is a better way – one that can allow you secure remote access to absolutely anything on your home LAN. I had used this method to connect to my hacked TiVo many years ago because its web interface didn’t have the option of SSL. I did find some Synology-specific info about it, but I suspect it was from much earlier DSM versions which perhaps didn’t have a decent SSH daemon, and so called for additional packages to be installed. I was sure that there must be a simple way to tweak the config of the existing daemon. Luckily I found this blog post which seems to be quite hard to find via Google.

UPDATE – no config changes are necessary, at least with DSM 3.2 onwards (can’t remember for 3.1).

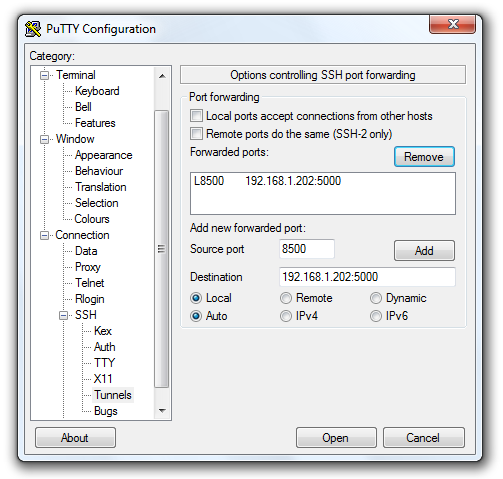
The concept is simple. You connect via SSH with PuTTY, but in setting up the connection you define some port mappings. So let’s say you wanted to be able to remotely use the DSM software on TCP5000, you can define a local port of say 8500 and remap that to the private IP of your Synology NAS at home on port 5000 (so 192.168.1.202:5000 in my case):

PuTTY tunnel settings

Don’t forget to click Add. Also in the options navigate to Window > Translation and set the character set to UTF-8.

Once you’re connected in PuTTY, point a browser to http://localhost:8500 and you’ll be connected to the DSM at the other end of the SSH tunnel – and securely too.

If you’re using a Mac or Linux computer the normal SSH client can be configured similarly from the terminal, e.g.:
ssh root@mynasip -L 8500:192.168.1.202:5000 -L 8123:192.168.1.202:8123

One final little mod is to enable coloured output in directory listings, and displaying of the current directory path in the shell prompt. Type:

echo alias ls="'ls --color'" >> ~/.profile
echo export PS1="'\w\$ '" >> ~/.profile
 

This will take effect at next logon. Directories are blue, executables are green, and symbolic links are cyan.

Shell colour directory listing

Catalyst 6500 Supervisor 2 firmware

I recently had a Catalyst 6500 Supervisor 2 fail and needed a complete replacement. It was one of a redundant pair and when the replacement unit arrived it had different firmware on it. Redundant pairs should have matched firmware, so I had to update it. Just in case this ever happens again, I wanted to record this information somewhere because it’s quite a tricky process.

How to upgrade ROMMON bootrom:
http://www.cisco.com/en/US/docs/switches/lan/catalyst6500/hardware/Config_Notes/78_13488.html#wp146316

upgrade rom-monitor slot 2 rp file tftp://x.x.x.x/c6msfc2-rm2.srec.122-17r.S5
 

Apart from the ROMMON flash regions, there are two flash filesystems on a Supervisor Engine 2 with MSFC and PFC (WS-X6K-SUP2-2GE)

  • bootflash:
  • sup-bootflash:

and if the second unit is present

  • slavebootflash:
  • slavesup-bootflash:

The route processor (rp) bootimage (e.g. c6msfc2-boot-mz.121-19.E1a.bin) should be on bootflash:

The full image (e.g. c6k222-pk9s-mz.122-17d.SXB4.bin) should be on sup-bootflash:

You can run limited commands on the standby supervisor using:

remote login module 2
 

You can query the ROMMON boot rom status like so:

show rom-monitor slot 1 rp
 

Gold means the version in ROM, F1 and F2 are the two flash regions. rp is the route processor, sp is the switch processor.

slot 1 (as route processor boots)

System Bootstrap, Version 12.2(17r)S5, RELEASE SOFTWARE (fc1)
Technical Support: http://www.cisco.com/techsupport
Copyright (c) 2005 by cisco Systems, Inc.
Cat6k-MSFC2 platform with 524288 Kbytes of main memory

slot 2 (before update)

System Bootstrap, Version 12.1(11r)E1, RELEASE SOFTWARE (fc1)
TAC Support: http://www.cisco.com/tac
Copyright (c) 2002 by cisco Systems, Inc.
Cat6k-MSFC2 platform with 524288 Kbytes of main memory

Configuring Ericsson / Aastra VoIP handsets by DHCP

Manually configuring VoIP handsets is a horrible job, and of course leaves you in a complete mess if you ever make any changes to those settings. I recently subnetted a building which was one flat network and wanted to prioritise VoIP traffic. Fortunately the Ericsson and Aastra handsets can be configured by DHCP, but typically it’s something you have to pester your telecoms provider for information about. Where I work this information was not volunteered when our Ericsson MD110 PABX was IP-enabled a few years ago. The reason I’m writing this up is that newer firmwares have changed this behaviour.

The handsets will boot from their bootrom firmware and then check their software firmware against the files on the ‘software server’, updating if out of date. This software server will typically be your DNA server. The files are served by IIS and are within the default Inetpub folder structure.

The handset settings are configured from DHCP on option 43, but this presents problems in infrastructures which contain other hardware which also depends on option 43. Fortunately, Microsoft Windows DHCP server allows configurable Vendor Classes – it can respond differently to requests based on their vendor class identifier string which they declare during DHCP discover and DHCP request, thus allowing re-use of the same option numbers. However, configuring this isn’t particularly intuitive hence my writing this up.

First right-click on your parent IPv4 tree in the DHCP MMC snap-in:

Microsoft DHCP server - Define Vendor Classes

Now create as follows:

Microsoft DHCP server - Define Vendor Class Aastra IP Phone

I discovered using Wireshark that newer firmwares since the Aastra rebranding identify themselves with the string Aastra IP-Phone whereas older ones use Ericsson IP-Phone. You should really create one for each, just in case you plug in an older handset one day.

Again by right-clicking on the parent IPv4 item select Set Predefined Options and complete as follows:

Microsoft DHCP server - Define option 43 Aastra IP Phone

At the root level of your IPv4 tree, select Server Options. Add a new option, but use the advanced tab:

Aastra IP Phone handset configuration options

This is the tricky part. Consider the binary data:

0f 41 61 73 74 72 61 20 49 50 2d 50 68 6f 6e 65 01 0b 31 37 32 2e 31 36 2e 31 35 2e 31 05 02 32 30

The bold hex numbers describe the following

  • 0f means 15 bytes in the following ASCII string Aastra IP-Phone
  • 01 0b means vendor-specific tag 01, followed by a 0b (11 in decimal) byte ASCII string
  • 05 02 means vendor-specific tag 05, followed by a 2 byte ASCII string

The tags are defined as follows:

  • Tag 01 – software server IP address
  • Tag 02 – proxy server IP address
  • Tag 03 – proxy port (must be defined if tag 02 is used)
  • Tag 04 – telephony domain name
  • Tag 05 – VLAN id 1 for the telephone
  • Tag 06 – VLAN id 2 for the telephone
  • Tag 07 – VLAN id 3 for the telephone

Since Vendor Classes can only be defined on a per DHCP server basis we can’t have dedicated voice VLANs per subnet unfortunately, to reflect how you separate your workstation VLANs. Since all your VoIP handsets will end up in the same VLAN, Ericsson added support for configuring two additional VLANs (using Tags 06 & 07). These additional VLANs will only get used if the handset is unable to get a DHCP lease on the VLAN defined in the preceeding tag.

As before you will need to define one set of option 43 settings for Aastra handsets, and another for Ericsson handsets:

Vendor Class DHCP option 43 settings for Aastra & Ericsson handsets

As the phone starts up it will request and obtain a lease on the native VLAN for the switch port it is connected to, will then read the option 43 settings, release that IP, and request a new lease on the specified VLAN.

Additional configuration such as NTP server settings, daylight saving time corrections, CoS, PC port VLAN etc. can all be configured in the model-specific config files in Inetpub on the DNA server.

Changing IP settings fast

When I need to keep changing TCP/IP settings to test networking configs it’s a real pain to have to keep opening up the adapter properties (especially on Windows 7) and usually I’m in too much of a hurry to lookup up the netsh command syntax. For that reason I’m posting this small script. Save it as ipset.cmd.

Note: using netsh to revert to DHCP seems to be intermittent if no DHCP server is available – e.g. if the adapter has no link.

Windows 7

@echo off
If "%1" == "" (
  echo Configures Local Area Connection
  echo   ipset address/maskbits gateway (dns)
  echo   ipset 192.168.1.99/24 192.168.1.254
  echo   ipset 192.168.1.99/24 192.168.1.254 8.8.8.8
  echo   ipset dhcp
  echo.
  goto :eof
)
If "%1" == "dhcp" (
  netsh interface ip set dnsservers name="Local Area Connection" source=%1
  netsh interface ip set address name="Local Area Connection" source=%1
  goto :eof
)
netsh interface ip set address name="Local Area Connection" source=static address=%1 gateway=%2
If "%3" == "" (
  :: OpenDNS public DNS servers
  netsh interface ip set dnsservers name="Local Area Connection" source=static address=208.67.222.222
  netsh interface ip add dnsservers name="Local Area Connection" address=208.67.222.220
) else (
  netsh interface ip set dnsservers name="Local Area Connection" source=static address=%3
)

Windows XP

@echo off
If "%1" == "" (
  echo Configures Local Area Connection
  echo   ipset address mask gateway
  echo   ipset 192.168.1.99 255.255.255.0 192.168.1.254
  echo   ipset dhcp
  echo.
  goto :eof
)
If "%1" == "dhcp" (
  netsh int ip set address local source=%1
  netsh int ip set dns local source=%1
  goto :eof
) else (
  netsh int ip set address local static %1 %2 %3 1
  :: OpenDNS public DNS servers
  netsh int ip add dns local 208.67.222.222 index=1
  netsh int ip add dns local 208.67.222.220 index=2
)

SIP with NAT on Netscreen Firewalls or: How I Learned to Stop Worrying and Love the ALG

The place where I work recently set up new additional business premises. The telephony system is a Mitel 3300 using SIP trunks directly from the cloud (Gamma Telecom). I’ve named the SIP provider only because this is likely to be important as a confirmed working example of Netscreen + Mitel + Gamma. This setup all seemed like a great idea until I wasted about a solid week of my time when it didn’t work as expected. A communications solutions provider designed and installed everything under contract but we supplied our own firewall – a Juniper Netscreen NS-50. Having used CheckPoint and Cisco PIX, I much prefer the Juniper for its decent GUI and instant policy changes (unlike CheckPoint). Our main motivation for using it was for consistency since we run another Netscreen at our main site.

Despite having many man-days of the comms company’s network specialists, Mitel specialists, dozens of packet traces, conversations with the SIP provider, and the reseller which supports our Netscreen, we made very little progress. The comms company were convinced the Netscreen was at fault despite never having flagged it up as a potential concern months earlier. Things were made more difficult by the lack of documented user experiences online which is why I’m writing this up. Many people using SIP tend to be using it between buildings, or to an internal gateway – not an external gateway on the public Internet. Also, it seems that other SIP-enabled PBXs can act as a media proxy which keeps things simple. However, although a Mitel PBX handles the call setup, each individual handset sends and receives media streams directly from the remote media gateway.

Can the Netscreen ALG translate Mitel 3300 SIP traffic? YES!

Despite most online opinions telling you to disable it, the Netscreen’s SIP ALG does indeed work correctly (running ScreenOS 5.4.0r16 in this case). Using an external SIP provider you absolutely will require a functioning ALG for inbound calls. Without it, you would need either a public IP for each handset in your organization, or a static translation in your firewall for each handset, or even a private tunnel to the SIP provider allowing them to route traffic for your private addresses. These aren’t very practical, though the last one can be implemented as a last ditch solution. I came very close to having to do that.

Before you start, read the ScreenOS 5.4 manual’s chapter on Voice over IP, particularly from page 23 onwards.

Configure your PBX as a MIP on the Untrust interface (typically Ethernet 3 on a Netscreen), making sure to create it on the trust-vr router (there’s a dropdown as you create the MIP).

Now create an Untrust to Trust policy as below. Leave the Application dropdown set to None (this will autoselect the most appropriate ALG – obviously SIP in this case):
Untrust-Trust firewall policy for SIP

Next create the Trust to Untrust policy defining the Source as network(s) which will include your PBX’s private address and those of all of your handsets. Widen the netmask if you need to. Note that I’ve had to include both the SIP and the Media gateways for the Destination:

Trust-Untrust firewall policy for SIP

From the outset the Netscreen was indeed translating IP addresses in the SDP fields of the packet datagrams, but the contractors were convinced that the ALG was faulty because it was trying to carry out call setup and media streaming on different IPs. As Gamma later pointed out – this is completely acceptable. Their endpoint does the same after all.

Though I was already doing this, according to Juniper KB7407 for the SIP ALG to work correctly you will need to use Policy-based NAT, not Interface-based – i.e. the Trust interface will need to be in Route mode, not NAT mode. Then for each Trust to Untrust policy you will need to click on Advanced and enable source translation like so:
Policy-based NAT

This is what gives you the blue policy action icon shown in the earlier screenshot. The firewall will NAT outbound SIP traffic on the MIP, but RTP media streams from the handsets will be NATed on the firewall egress interface (ethernet3). This is by design – don’t let anyone tell you this won’t work, because it does!

I can vouch for these settings, so if your test calls still aren’t connecting then it’s quite likely that either your firewall policy isn’t quite right (try temporarily relaxing the policies by adding some Any values), or the Mitel isn’t correctly configured. In my case I got Gamma Telecom to send over their best practice guide for the Mitel 3300 from their knowledgebase which revealed that a few settings had been set differently on ours including the contentious sounding Enable Mitel proprietary SDP which Gamma wanted disabled. Another crucial one is Suppress Use of SDP Inactive Media Streams – without it you won’t be able to transfer external calls to another handset. Their screenshot looked to be from an earlier release of the Mitel software so here is a view of our working settings taken from Trunks > SIP > SIP Peer Profile in the WebUI:

SIP peer profile settings

For inbound calls to your PBX, double-check how many digits of your DDI numbers the remote SIP endpoint is sending in the SIP message headers and configure the Mitel to match – we had a mismatch here with ours which again would have spoiled many of our earlier tests. Set the number of leading digits that get truncated off the incoming DDI to transform it into an internal extension number at Trunks > Trunk Attributes > Dial In Trunks Incoming Digit Modification – Absorb.

It’s worth stating that this Netscreen/Mitel configuration works with the default endpoint config at the Gamma Telecom end. During troubleshooting they changed many settings which may have complicated things even more, but I am told it has all been reset to the standard specification.

To debug the SIP ALG on the Netscreen download PuTTY and enable logging to a file. Then SSH into your Netscreen and type:

set dbuf size 512
clear dbuf
debug sip all

Now carry out your test call, then:

undebug all
get dbuf stream
set dbuf size 128

This will dump pages of output to the screen, too much for the buffer but now you can open the log file you told PuTTY to save.

There are so many variables to getting this to work, and you will most likely have to draw on the expertise of several different people, but the only way forward is careful methodical testing. Never change more than one thing at a time. In my case the working solution saw me use the exact same firewall settings I had used at the very beginning. The issues turned out to be solved by tweaking of the PBX and remote SIP gateway, though in the thick of it I also upgraded from ScreenOS 5.4.0r8 to 5.4.0r16. However, because the comms contractor kept sending different people to work on the problem the testing was not really consistent until it was just me alone dealing directly with Gamma Telecom support, in control of the firewall, and with WebUI access to the Mitel.

Good luck! If this page saves days of your life going stir crazy in a comms room, nights away at a remote site staying in a hotel etc., then I’d love to hear about it. As you can guess I wasn’t so lucky…

UPDATE – unfortunately transferring external calls is not currently possible with this setup. It looks like that ALG isn’t dealing correctly with the way the Mitel does this (a second INVITE, placing RTP stream on hold etc.).

UPDATE 2 – enabling the Mitel SIP Peer Profile setting Suppress Use of SDP Inactive Media Streams fixes call transfers with consultation (I updated the screenshot above). Blind call transfers still don’t work unfortunately.

Wake on LAN for VPN users

In the absence of a Terminal Server, having users remotely use the software on their desktop PCs is often easier than having to manage software packages on laptops which may be part of a generic pool. In an energy conscious business there is the problem of what to do if one of your remote users wants to get at their desktop PC while it’s asleep or powered down. Wake on LAN works by sending a magic packet – featuring the target PC’s MAC address – to the network broadcast address. A MAC address is pretty unwieldy, so the ideal solution is an intranet page allowing users to wake a PC by hostname once they’re connected to the VPN.

To do this you will need some kind of host database to link hostnames to MAC addresses (remember – the machines could be switched off, so the DHCP database is no good). Your intranet server must also be on the same subnet as the machines you intend to wake. I have only used this in a single subnet so I haven’t investigated scalability, but it just looks like a case of enabling directed broadcasts on your routers. My login script updates host database entries and collects other WMI info such as make & model, tag number, spec, etc.

I implemented this Wake on LAN four years ago so there may be neater ways of doing it by now. At the time I couldn’t do the whole thing in ASP because there was no free socket library for VBScript, so I used Perl to create the magic packet. I used a generic wakeonlan.pl script by José Pedro Oliveira and tweaked it to post back to the ASP page.

Here are the required scripts – the first is ASP part you would need for the Intranet page:

<% Language=VBScript %>
<p>Wake your PC to allow you to connect to it remotely.</p>
<form method="get" action="./default.asp">Name of PC to power on: <input name="hostname" maxlength=14><input type="submit" value="wake"><br>
<%
Dim strHostname
strHostname = Request.QueryString("hostname")

'check query string from form above
If Not strHostname = "" Then
  'remove potential SQL injection attack characters
  strHostname = killChars(strHostname)
  Dim strConnection, objConnection, objRecordSet, objCommand, objResult

  'create connection object
  strConnection = "Provider=SQLOLEDB; Data Source=sqlsvr.domain.com; Initial Catalog=HostDB;User Id=HostDB_RO;Password=yourpassword"
  Set objConnection = CreateObject("ADODB.Connection")
  objConnection.Open strConnection

  'create command object
  set objCommand = CreateObject("ADODB.Command")
  objCommand.ActiveConnection = objConnection

  'check to see if a MAC exists for this hostname - you'll need to customize this depending on your database
  objCommand.CommandText = "SELECT * FROM Inventory WHERE Hostname='" & strHostname & "'"
  set objRecordSet = objCommand.Execute
  If Not objRecordSet.EOF Then
    'if it does exist then wake it
    Response.Redirect ("./wakeonlan.plx?MAC=" & objRecordSet.Fields.Item("MAC").value)
  Else
    Response.Write ("<em>Unknown computer: '" & strHostname & "'.</em>")
  End If
  objRecordSet.Close
  Set objCommand = nothing
  objConnection.Close
  Set objConnection = nothing
End If

'check query string for result from wakeonlan.plx
Dim strResult, strMAC
strResult = Request.QueryString("result")
If strResult = "True" Then
  Response.Write("<em>Wake-up packet sent. Wait around one minute before connecting.</em>")
End If
If strResult = "False" Then
  Response.Write("<em>Invalid MAC.</em>")
End If

'sanitize against SQL injection attacks
Function killChars(strWords)
  Dim arrBadChars, strNewChars
  arrBadChars = array("select", "drop", ";", "--", "insert", "delete", "xp_", "'", "=", " ")
  strNewChars = strWords
  For i = 0 To uBound(arrBadChars)
    strNewChars = replace(strNewChars, arrBadChars(i), "")
  Next
  killChars = strNewChars
End Function
%>
</form>

And this is wakeonlan.plx:

#!/usr/bin/perl
#
# wakeonlan.plx
# based on José Pedro Oliveira's wakeonlan.pl v1.4.2.3 <jpo@di.uminho.pt>

use strict;
use Env "QUERY_STRING";
use Socket;

# your LAN broadcast address
my $DEFAULT_IP = '172.16.1.255';
my $DEFAULT_PORT = getservbyname('discard', 'udp');
my %FORM;
my $result;

&parse_query_string;
&wake($FORM{MAC});

print 'Status: 302 Moved', "\r\n", 'Location: ./default.asp?result=', $result, "\r\n\r\n";

sub parse_query_string {
  my ($buffer, @pairs, $pair, $name, $value);
  if (length ($ENV{'QUERY_STRING'}) > 0){
    $buffer = $ENV{'QUERY_STRING'};
    @pairs = split(/&/, $buffer);
    foreach $pair (@pairs){
      ($name, $value) = split(/=/, $pair);
      $value =~ s/%([a-fA-F0-9][a-fA-F0-9])/pack("C", hex($1))/eg;
      $FORM{$name} = $value;
    }
  }
}

sub wake {
  my $hwaddr  = shift;
  my $ipaddr  = $DEFAULT_IP;
  my $port    = $DEFAULT_PORT;
  my ($raddr, $them, $proto);
  my ($hwaddr_re, $pkt);

  # Validate hardware address (ethernet address)
  $hwaddr_re = join(':', ('[0-9A-Fa-f]{1,2}') x 6);
  if ($hwaddr !~ m/^$hwaddr_re$/) {
    $result = "False";
    return undef;
  }

  # Generate magic packet
  foreach (split /:/, $hwaddr) {
    $pkt .= chr(hex($_));
  }
  $pkt = chr(0xFF) x 6 . $pkt x 16;

  # Allocate socket and send packet
  $raddr = gethostbyname($ipaddr);
  $them = pack_sockaddr_in($port, $raddr);
  $proto = getprotobyname('udp');

  socket(S, AF_INET, SOCK_DGRAM, $proto) or die "socket : $!";
  setsockopt(S, SOL_SOCKET, SO_BROADCAST, 1) or die "setsockopt : $!";

  $result = "True";

  send(S, $pkt, 0, $them) or die "send : $!";
  close S;
}