Tag Archives: DXVA

DXVA VC-1 playback on Intel GMA 500

This will only work on Vista or Windows 7. I suggest using the following test clips since they are already on your computer if using Windows 7:

  • C:\Users\Public\Videos\Sample Videos\Wildlife.wmv
  • C:\Windows\Performance\WinSAT\Clip_1080_5sec_VC1_15mbps.wmv

As you can see from the DXVA Checker tool, the GMA 500 can decode VC-1 in hardware. Though Windows 7 includes DXVA hardware assisted playback of H.264 out of the box, for some reason it only considers the GMA 500 capable of VC-1 motion compensation acceleration which is a small part of the entire decode process – so VC-1 playback is choppy.

The good news is that for Windows Vista Intel released a bundle of DXVA codecs for the GMA 500. They’re not available from the Intel drivers website but fortunately Sony’s US site has them. The installer will only extract the drivers if it’s running on a Vaio P, but you can use a tool like Universal Extractor to unpack them (look in \tempexefolder). On Windows 7 you will need to run Setup.exe in Vista compatibility mode otherwise it will fail.

Once the decoder is installed you may notice that you cannot get it to work in Media Player Classic Home Cinema, even by forcing it to be the preferred decoder (as with H.264 in my other post). This is because MPC-HC works with the DirectShow multimedia framework, but the Intel VC-1 decoder is written for Media Foundation – Microsoft’s replacement framework which launched with Windows Vista.

This unfortunately means that you’re limited to using Windows Media Player for hardware accelerated VC-1 content, so subtitles are not going to be possible. The next problem is that WMP aggressively selects its own decoder in favour of the Intel one. There is no neat way to set preference order as with DirectShow, so we need to make some Registry edits.

Open Regedit and navigate to HKLM\Software\Classes\MediaFoundation\Transforms\Preferred.

Export the whole branch and keep it somewhere safe (say foundation-orig.reg). Still in Regedit, right-click on this Preferred key and edit the permissions. Take ownership (Advanced > Owner tab), then grant Full Control to Administrators.

At the level \Transforms notice that there is an entry with a long alphanumeric CLSID for each registered decoder. Find the one called WMVideo Decoder MFT, which should be {82d353df-90bd-4382-8bc2-3f6192b76e34}. Find the CLSID for Intel® Media Codecs VC-1 Decoder for Intel® System Controller Hub, which ought to be {2b53d708-ffe1-4da3-b3a8-f8ec247c374f}.

Using Notepad, load the registry backup of the Preferred key you exported. This is a list of video formats also represented by CLSIDs, together with the CLSID of the decoder which will be used to play them back. So all we need to do is replace all instances of {82d353df-90bd-4382-8bc2-3f6192b76e34} with {2b53d708-ffe1-4da3-b3a8-f8ec247c374f} and save as foundation-mod.reg (always keep the original just in case!). Then double-click it and commit the changes.

Now if you run DXVA Checker and click on Check DirectShow/MediaFoundation Decoders at the bottom and browse to a VC-1 clip, you should see the following:

Intel Media Codec VC-1 DXVA

Note that some guides will tell you to take ownership then rename the file C:\WINDOWS\SYSTEM32\WMVDECOD.DLL which may well achieve the same result, but it will break the Windows Experience Index test process – it plays a WMV clip with this decoder during the benchmark and will fail with an error if that file is missing.

By switching between the original and modified .reg files and comparing playback you’ll notice that the Intel VC-1 decoder uses around 50% CPU on a 1.33GHz Atom Z520 Vs. 100% and stuttering with the Windows one.

Update – the Intel decoder seems to have difficulty rendering crossfades, as you can see from the artifacting while playing this nVidia demo clip and some of the content on the Microsoft WMV HD content showcase. It’s a shame the decoder doesn’t seem to be actively maintained, however all of these clips are years old so perhaps they were encoded with immature encoders.

Update 2 – I have since noticed that the clips from Microsoft’s showcase and that nVidia one are not in fact VC-1. They’re WMV3 which was a slightly earlier codec. The true VC-1 clips which I have tried are decoded without artifacts. You can check the video codec used in a file by running ffmpeg -i on them.

Continue to DXVA H.264 playback on Intel GMA 500 with subtitles (Windows 7)

DXVA H.264 playback on Intel GMA 500 with subtitles (Windows 7)
Update – This guide was updated on 04/04/2012

Out of the box, Windows 7’s Windows Media Player (WMP) will play HD video using the Intel GMA 500 and DirectX Video Acceleration (DXVA) to do the decode. Using the Matroska Splitter you will also be able to play MKV files. However, they may occasionally stutter and use a fair amount your humble Atom Z series CPU’s power (around 40-50% of 1.33GHz), and you won’t be able to use subtitles.

The PowerDVD H.264 decoder on the other hand will use about 10-20% less CPU, is less prone to locking up, and by using Media Player Classic Home Cinema (MPC-HC) you gain subtitle rendering support. Apparently PowerDVD does itself support MKVs with subtitles but on the several occasions I have attempted this with the trial version it has locked up and crashed. If you don’t have the PowerDVD decoder, you can use the ‘ffdshow tryouts’ open source decoder which is a very good alternative, but seems to suffer some screen tearing during high motion scenes while subtitles are enabled.

Ingredients

  • Media Player Classic Home Cinema (MPC-HC 1.60.4014 at the time of updating this document) – don’t confuse with Media Player Classic, this is a separate version
  • Matroska Splitter (optional) – this reads the MKV container format. MPC-HC has its own implementation included but you could use this if you want to play MKV files in Windows Media Player
  • Optional DirectVobSub subtitle renderer for Windows Media Player (will not work for MKVs), useful for Xvid/DivX files though
  • PowerDVD’s H.264 decoder CyberLink Combo MPEG-2/H.264/VC1 Decoder v.1.0.4960.3320
  • or ffdshow tryouts decoder – don’t use the beta release, it doesn’t have the DXVA decoder. I tested with the SVN build.
  • DirectX End-User Runtimes (June 2010) – required for the EVR Custom Presenter renderer which is needed for subtitle compositing

Method

Firstly disable Aero.

If you want to have subtitles in WMP for Xvid/DivX movies then download and register vsfilter.dll. To do this, copy the DLL to C:\Windows\System32 and open a Command Prompt using right-click & “Run as Administrator”. Then type
regsvr32 c:\windows\system32\vsfilter.dll

If later on you want to remove this, just open the Command Prompt as Administrator and type
regsvr32 /u c:\windows\system32\vsfilter.dll

When it’s registered you can open an Xvid AVI file in WMP and, as long as there’s an SRT subtitle file with the same filename as the AVI then you will see your subtitles. There will be a new icon in the system tray which will allow you to toggle subs, as well as choose the language if there are several sets of subs.

Now install Haali Splitter if you want MKV support in WMP and other players. When you load a MKV, it behaves in a similar way to VSFilter (icon in systray), except it’s even more versatile since MKV containers can have different soundtracks too.

Next, install MPC-HC.

Now use WinRAR to extract the DirectX End-User Runtime file you downloaded. In WinRAR, select File > Open, then change the filename dropdown from All archives to All archives including self-extracting. Browse to your downloaded directx_Jun2010_redist.exe and open it. Inside you will find some more archives. Drag and drop to extract the file Jun2010_d3dx9_43_x86.cab, then open this in WinRAR too. Extract the file d3dx9_43.dll into the folder C:\Program Files\Media Player Classic – Home Cinema.

Finally, install the Cyberlink H.264 decoder or ffdshow. During setup ffdshow will offer a choice of decoders to use, pick libavcodec (not ffmpeg-mt).

Now we need to configure MPC-HC. Load it then go to View -> Options.
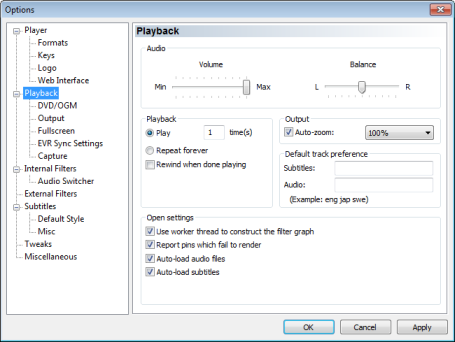
Go to Playback, and make sure Auto-load subtitles is set (assuming you want them). Note that you can also set language code preference orders for audio and subs:

Auto load subtitles

Move to the section called Output. If you will never use subtitles select EVR and don’t touch anything else.
If you do want subtitle support, use EVR Custom Presenter, reduce the EVR buffers from 5 to 4, and check the Alternative Vsync and D3D Fullscreen boxes. With the default settings the additional load of compositing subtitles brings the framerate down below 24fps, however by using these last two options we can just maintain 24fps.

Output settings

Now select the heading Internal filters and uncheck both H.264 options on the right. This stops MPC-HC using its own support for those features, since we’re going to use external modules for those. If you’re using the CyberLink Video Decoder version I posted above you can optionally uncheck the MP4/MOV and MKV source filters which will cause the CyberLink ones to be used instead (it doesn’t seem to improve performance).

Internal filters

Under the heading External Filters click Add. Then browse to the CyberLink Video Decoder and add it. Make sure to set it to Prefer on the right as shown. If you’re using ffdshow then instead add ffmpeg DXVA video decoder an set to Prefer.
If you installed the Vsfilter.dll subtitle driver (some other media players/codec packs will register this) we need to add DirectVobSub (auto-loading version) too, but select Block on the right. This prevents it from loading, since we’re using MPC-HC’s subtitle renderer. Apparently the way DirectVobSub renders is fundamentally incompatible with DXVA:

External filters

Close MPC-HC for the settings to take effect. At this point it’s a good idea to associate .mkv files with MPC-HC. If videos are launched by double clicking like this, when you pin MPC-HC to your Start Menu it will have that child menu showing you the last ten or so files you launched which is very useful.

Start an H.264 encoded MKV in MPC-HC and as it starts to play, right-click on the video window and select Filters -> CyberLink Video Decoder. Check that DXVA is selected. I believe that HAM mode uses OpenCL on GPUs that support it (the GMA 500 doesn’t) which if I remember was recommended for ATI GPUs, the early ones having glitchy DXVA implementations apparently. If you’re using EVR Custom Presenter you wont be able to do this with D3D Fullscreen enabled, so toggle it and reload MPC-HC to verify this step.

CyberLink decoder filter settings

Close and reopen MPC-HC and you should be done! Though using D3D Fullscreen reduces tearing and seems to keep the framerate higher when using the EVR Custom Presenter renderer you cannot right-click and see the normal MPC-HC GUI elements. You have to use Ctrl-C to exit playback to modify settings. Two essential keyboard shortcuts are A to switch audio track, and S to switch subtitle track, though shortcut keys do exist for just about everything, and can be customised in the Player > Keys menu in Options.

If using ffdshow you also need to enable hardware acceleration by running Start Menu > All Programs > ffdshow > DXVA video decoder configuration:

DXVA decoder settings

ffdshow’s built-in subtitle rendering seems to produce smeary artifacts on the picture so ignore those options and use MPC-HC’s subtitles instead.

If you have a video that won’t playback nicely with this setup then it’s likely that the bitrate is too high for the GMA 500 to cope with (a straight 1:1 rip from Blu-ray for instance) or perhaps the file has not been encoded to be fully DXVA compliant (quite likely with older stuff). Framerates over 24fps cannot really be played unfortunately.
There are some H.264 movie trailers available here for testing.
In my experience the GMA 500 in my VAIO P will play most 1080p content perfectly well, even outputting to a TV at 1920 x 1080. If in doubt about whether it’s dropping frames, while using EVR Custom Presenter you can press CTRL-J several times to view the frame rate (get rid of the graph and verbose text – they slow it down even more!).

Further reading

This handy guide explains in detail what all the options in MPC-HC mean.

Continue to DXVA VC-1 playback on Intel GMA 500 or learn how to get a surround sound experience from ordinary headphones.