
In theory using the vCenter Server Appliance (hereafter vCSA) offers a number of big advantages over using vCenter. Firstly you don’t need to commit a Windows Server OS licence, secondly to manage your VMs you can use a Flash-enabled browser on any operating system (including on Surface RT!), and thirdly it should be a lot quicker to deploy.
On that last point, a number of configuration steps in the setup of the vCSA are counter-intuitive and can waste a substantial amount of time. This is because the vCSA defaults to a hostname of localhost.yourdomain.com. The various web services that the appliance runs (SSO, Lookup Service, Inventory Service, vSphere Web Client) interact with each other using SSL sessions and, although there’s a built-in method to make vCSA regenerate its self-signed certificates at boot time, at the time of writing this does not work once these web services have been configured.
If you do not edit the hostname, you will not be able to enable AD authentication, and will likely encounter “Failed to connect to VMware Lookup Service https://yourhostname:7444/lookupservice/sdk – SSL certificate verification failed” when attempting to use the vSphere Web Client. However if after completing the initial setup wizard you configure the hostname to something meaningful and try to regenerate the SSL certificates, the vCSA will hang at boot time, displaying:
Waiting for network to come up (attempt 1 of 10)...

Appliance Name - VMware_vCenter_Server_Appliance

Configuration for eth0 found

The network for interface eth0 is managed internally, network properties ignored

DNS : x.x.x.x

Hostname or IP has changed. Regenerating the self-signed certificates.

Starting VMware vPostgres: ok

Waiting for the embedded database to start up: .[OK]
Furthermore, most of the potentially useful VMware KB articles assume a dedicated vCenter, rather than a vCSA. There seems to be no way out of this boot hang, and you will have to start deploying the vCSA all over again. The trick is to cancel out of the Setup wizard and change the hostname at the very start, before the various web services have been initialized at all.
I have outlined the successful setup process here as a reminder for future deployments:
- When downloading the vCSA, download the .ova file. Ignore the other .vmdk and .ovf downloads, the .ova one will allow you to set up the IP address details at the time of deployment rather than having to change them later.
- It is recommended to use Thick Provisioning for the disk, despite 120GB being overkill for typical small deployments.
- Enter the chosen static IP address, network and DNS settings. Sadly they left out a hostname field here which would have saved a lot of grief.
- Do not start the VM on completion of the wizard, then reduce the vCSA virtual machine RAM from 8GB down to 4GB – the supported minimum configuration for small deployments of less than 10 hosts.
- As per the instructions displayed on the vCSA VM console, connect a web browser to port 5480 (the default credentials are root and vmware), and accept the EULA.
- At this point quit the Setup wizard. Failure to do this will cause SSL certificate issues later.
- In the Network tab change the hostname, in the Admin tab change the root password and enable SSL certificate regeneration, and finally in the System tab set the correct time zone then reboot.
- Create a DNS A record for your vCSA.
- After the reboot when you connect back to the admin console, the hostname in the certificate will remain as localhost.yourdomain.com – this is apparently normal.
- Disable SSL certificate regeneration.
- Start the Setup wizard again from the main vCenter Server tab Summary screen.
- Select “Configure with default settings”.
- Enable AD authentication (an Active Directory Computer account object will be created for your vCSA).
- Despite having enabled Active Directory authentication, this will not work until the AD domain SSO Identity Source has been configured – you’ll see the error “A general system error occurred: Authorize Exception”. The VMware documentation mentions using the SSO Admin account to do this (admin@System-Domain) but this password is not defined by the user when deploying a vCSA. By default the root account is also an SSO admin, so log in to vSphere Web Client on port 9443 as root. Navigate to Administration > Sign-On and Discovery > Configuration > Add Identity Source:
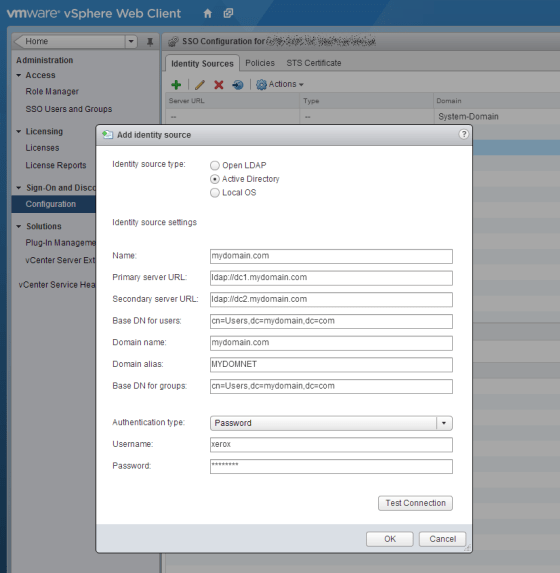
- Enter the server URLs in the format ldap://dc1.mydomain.com
- The DNs will probably both be cn=Users,dc=yourdomain,dc=com since you are only likely to need the Domain Admin user or Domain Admins group.
- You need to set the Domain Alias to the NETBIOS domain name or else the vSphere Web Client plugin’s “use windows credentials” option will not work.
- Set Authentication Type to Password and use a basic AD user account that you might use for photocopier scan-to-email directory lookups. Test the settings and save once working ok.
- vCSA does not implicitly trust Domain Admins like a standard vCenter installation would, and the permissions are somewhat difficult to find in the vSphere Web Client. Navigate Home > vCenter > vCenter Servers > your vCSA > Manage tab > Permissions:
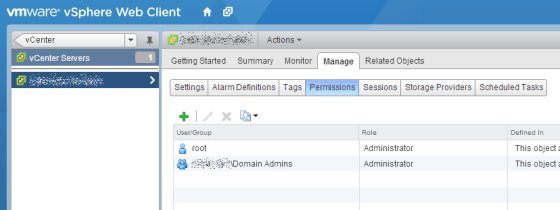
- Add your required AD groups to the role Administrator.
- I had a further issue after all this, where connecting using vSphere Client with the “use windows credentials” option would result in the error “A General System error occured: Cannot get user info”. This is due to an omission in the vCSA which has been fixed in the latest download version (currently 5.1.0.10100-1123965). You can get around this by editing a config file on the vCSA.
- One final reboot of the appliance is necessary to avoid permissions errors from the Inventory Service when logging into the vSphere Web Client with Windows session authentication. Be aware that the port 9443 web service can take several minutes to start, even after the console of the appliance has apparently finished booting.
- In environments where you can’t afford the 120GB of disk space for the vCSA, you could use VMware Converter to V2V the appliance, resizing to say 40GB in the process.


